Scott Aerator
Scott Aerator Solar Pond Aerator - Boilermaker, 4-Panel
Scott Aerator Solar Pond Aerator - Boilermaker, 4-Panel
Couldn't load pickup availability
Description
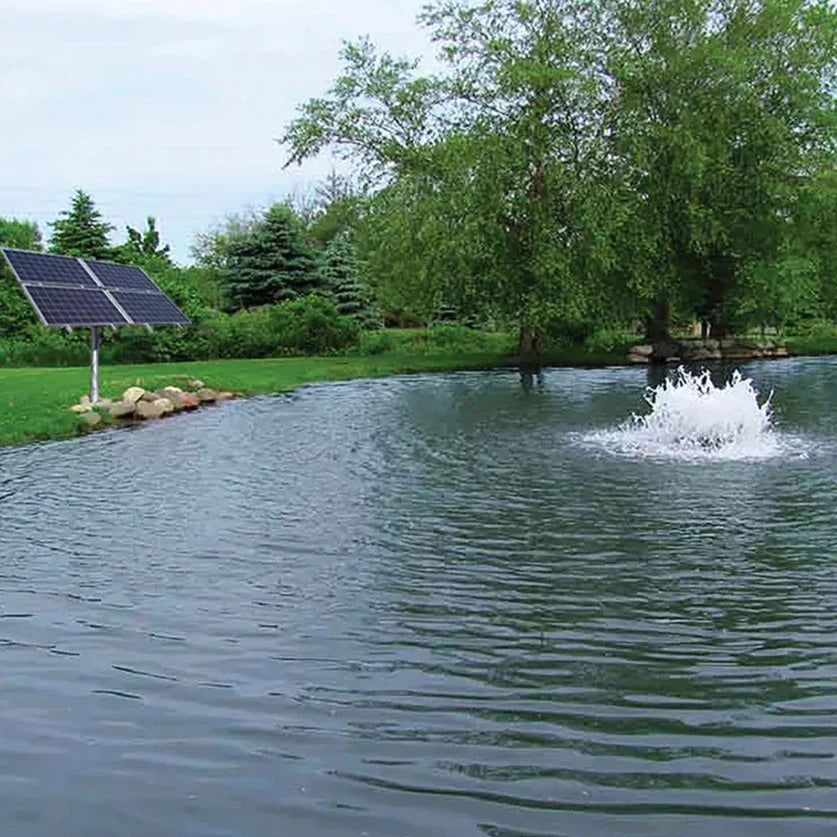
The Scott Aerator Solar Boilermaker Aerator (4-Panel): an eco-friendly and cost-effective solution for aerating large, remote ponds.
Do you have a spacious pond without access to electricity? The 4-Panel Solar Boilermaker Aerator features a variable-speed, submersible induction motor from Franklin Electric that can move up to 300 gallons of water per minute.
As one of the most environmentally conscious water aerators available, the Boilermaker is designed to enhance pond health while minimizing water display. Its low-profile design and solar-powered motor ensure efficient water circulation, promoting maximum oxygen transfer. This additional oxygen benefits your fish and accelerates the breakdown of decaying organic matter at the pond's bottom, leading to reduced muck over time. Additionally, the Boilermaker generates strong surface currents that quickly clear away surface algae and debris.
Designed for daytime use, the unit activates with sunlight, operates at varying speeds, and automatically shuts off at night. Its solar PV array panels gradually increase water flow in changing sunlight conditions, eliminating the need for expensive, high-maintenance batteries that many solar aerators require. The motor is constructed from stainless steel and is oil-free, ensuring exceptional durability and minimal maintenance.
Moreover, the Boilermaker serves as an effective pond de-icer during winter months. Like all products from Scott Aerator Company, it is engineered to avoid the need for costly winterizing products and procedures. Simply leave the aerator in the water, disconnect the power supply, and it will be ready for use when the water thaws in spring. All components are built to withstand sub-zero temperatures without damage.
This easy-to-install system includes the Boilermaker aerator, four solar panels with a frame, a disconnect box, a Fhoton™ drive solar inverter, and all necessary wiring components. You will need to provide a vertical pole for the panels and frame, a concrete base for the pole, and two anchor ropes with weights or tethers for the aerator.
The Boilermaker is proudly made in the USA and comes with an unconditional 5-year motor warranty. It includes 70 feet of heavy-duty, 12-gauge, submersible power cord, with longer lengths available upon request.
The Boilermaker solar aerator is suitable for both fresh and saltwater. Please disconnect the power source when swimmers are present.
Installation
1. Assemble The Unit
Assembling the Scott Aerator Fountains takes approximately 15-20 minutes. Instructions will be provided with your fountain. The fountain kits include:
- Pump with cylindrical casing and attached power cable
- Square float platform
- Protective stainless steel filter
- Decorative nozzle (not applicable to the DA-20)
- 5/16"x2" stainless steel bolts
- Stainless steel nuts & washers
- Self-tapping stainless steel screws
Tools Needed: A wrench (or socket driver) and pliers.

Assembly Steps:
- Start by placing the fountain housing on a stable surface, ensuring the pump discharge opening is facing upwards.
- Attach nylon rope (not included) to the two stainless steel eyebolts, which will serve as the anchoring lines for the fountain.
- Position the float and secure it using the two 5/16" x 2" bolts, washers, and nuts provided.
- Turn the fountain upside down, remove the Styrofoam doughnut, and place the stainless steel filter in position. Align the pre-drilled holes on the fountain with the markings on the filter and secure it with the three self-tapping screws included.
2. Attach Lights (If you did not order lights, skip this step)
Scott Aerator fountain light kits easily attach to the square float platform. The light kits include:
- (2) or (4) LED light fixtures with power cable
- 1/2" bolts & nuts
- (2) or (4) stainless steel arm brackets
- Timer/control unit
- Remote control (only for color-changing lights)
Tools Needed: Wrench & Pliers
*Note: The included timer/control unit is necessary for operating the lights. Do not disconnect the cord from the control unit, as this will void the warranty for the lights.
Assembly Steps:
- Attach each arm assembly to the water feature, ensuring the arms are oriented with the “L” facing upward. Remove one of the 2" bolts securing the float to your Scott water feature and align the holes with the stainless steel arm. Reinsert the bolt with a washer, passing it through the housing, float, and stainless steel arm. Secure it with a washer and nut. Repeat for the remaining arm assemblies.
- Next, attach each light to the slotted end of the stainless steel arms. Insert a 1/2" x 1/4" bolt downward through each light bracket and steel arm, then secure it with a 1/4" nut. The lights can be adjusted along the arm by loosening the lock nut, moving the light to the desired position, and then re-tightening the nut.
- Connect the lights to the Timer Control Unit by aligning the pins and twisting the connector together half a turn only. Avoid forcing the connection tight to prevent damage to the O-ring or wiring.
3. Place in water
- Once the unit is fully assembled, it is ready to be placed in the water for final adjustments and anchoring.
- Handle the fountain with care; it is crucial that the weight of the fountain is not placed on the stainless steel filter.
- Once the fountain head is submerged, secure it by screwing it into place (not applicable to the DA-20).
- Float the fountain to your desired location and secure the attached nylon ropes to the shore or use two concrete blocks submerged at least 20 feet apart.
- The final step is to connect your fountain and lights to your established power source. Always use a ground fault circuit interrupter (GFCI) and consult a licensed electrical contractor for power source installation.
Buying Guide
Choosing Horsepower
- The horsepower will influence the size and flow rate of your fountain's spray. Higher horsepower means more water movement and a larger or thicker spray.
- Selecting horsepower depends on your budget and pond size. While this choice is largely personal, a good guideline is to ensure there is at least 10 feet between the fountain spray and the pond's edge.
Choosing Voltage
- When in doubt: Contact us.
- If supplying 115V power to the pond's edge, be aware of the maximum distances from pump to breaker (including the power cord you order).
- If supplying 230V to the pond's edge, distance is generally not a concern.
| Motor Size | Max distance from pump to breaker on 115V |
| 1/3 HP 115V | 280' |
| 1/2 HP 115V | 250' |
| 3/4 HP 115V | 200' |
| 1 HP 115V | 150' |
Choosing LED Lights (Optional)
- Can be purchased now or added later. Light sets easily attach to the float.
- Lights operate on 110V and come with their own power cord.
- Options include single-color warm white LED lights or color-changing LED lights.
- Both options include a programmable timer, and the color-changing lights come with a remote control that works up to 1,000 feet away.
- 2-light sets are recommended for 1 HP and below.
- 3-light sets are recommended for 1.5 HP and 2 HP.
- 4-light sets are recommended for 3 HP.
Choosing Timers (Optional)
- Can be purchased now or added later.
- Timers are designed solely for controlling fountains, not lights.
- FAQ: The difference between the residential and commercial 230V timer is that the residential box is plastic while the commercial box is metal. Both serve the same function.